Asset Management
Enhanced Asset Tree View – Facility View
- We have moved the Facility View to the Asset Tree View to make better use of the Tree View but also to provide a higher-level view of the Asset conditions at the Division/Department/Work Cell levels.
- Please refer to the example below:
- A Facility view was added at the Division level (multiple Facility Views can be added per Division) called “Springfield Factory Layout” – shown in yellow. Clicking on the name of the layout will open the Facility View for editing/adding new objects.
- Within that Site (Division), multiple Rooms (Departments) were added – shown in grey.
- Within the Rooms, multiple Assets were added that are colored based on the Asset status, reference shown in the Asset Legend.
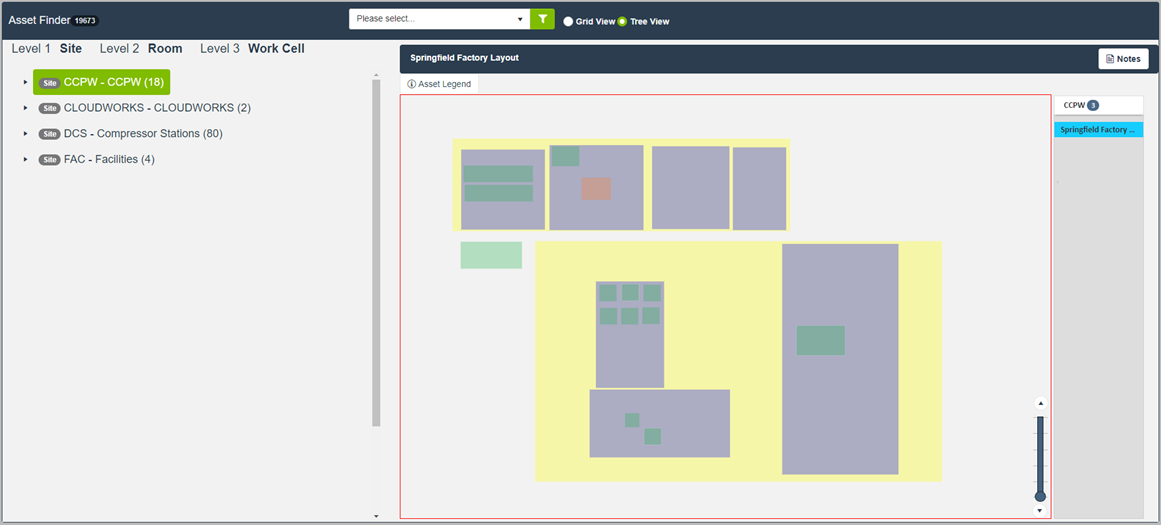
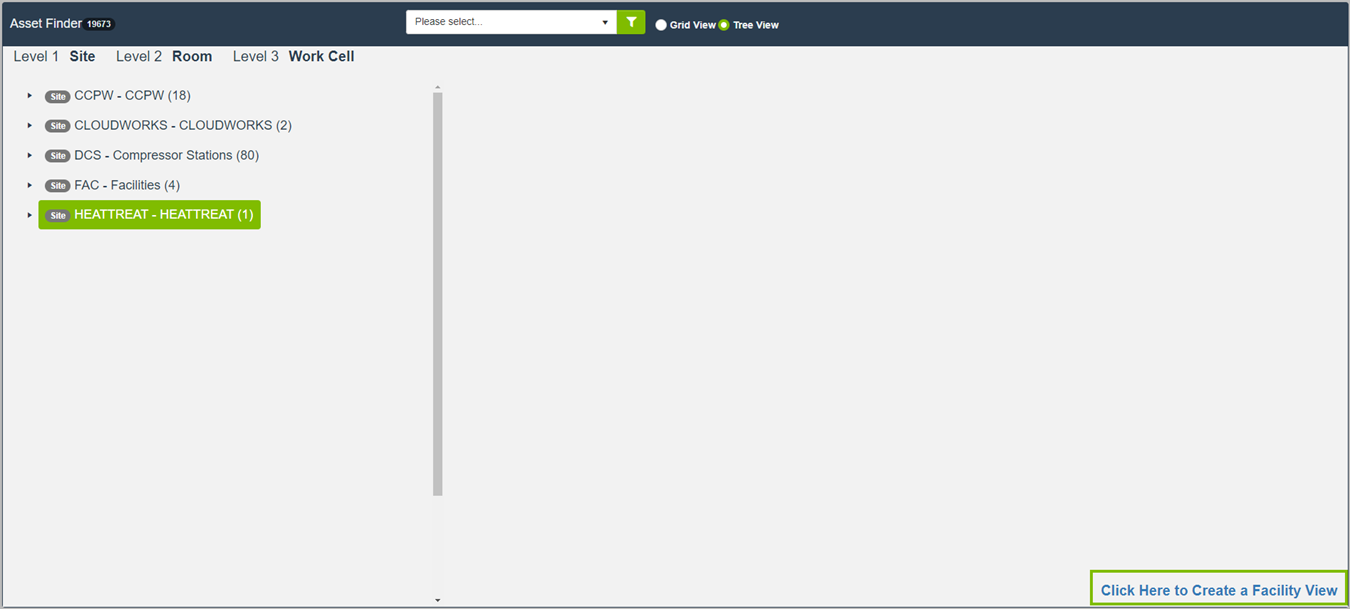
- Clicking on a Division/Department/Work Cell without a linked Facility View will show a button at the bottom to create a Facility View and optionally attach a picture file to act as a background, typically a floor plan. Allowed picture file types include PNG, JPG, JPEG, BMP, TIF but not non-picture file types, PDF, for example.
Work Management
Procedures
- We have added a new card to the Procedure Master to show linked Assets and Recurring Work entries.
Work Order Procedures
- We have added functionality to allow users to view and complete Procedures separately within a Work Order. This completion percentage is shown on the Work Order under the Work Completion card.
Enhanced Assigned To Rotations
- In response to customer feedback and a desire to further improve on managing Work Orders created from Recurring Work entries, we have added functionality to create and manage user-defined Rotations to be used.
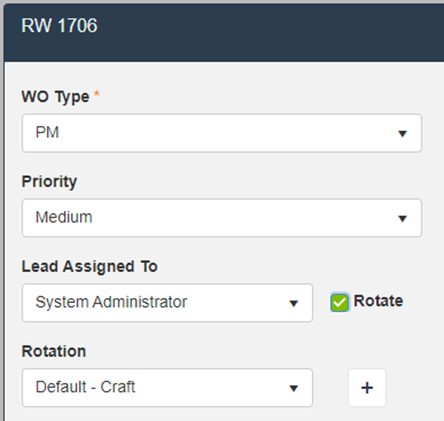
- From within the Recurring Work entry, clicking the Rotate button will show a new field to choose the Rotation. The default as noted in the dropdown is to Rotate alphabetically through the chosen Craft, the other values in the dropdown are the setup Rotations as shown in the example below.
- When a configured Rotation is selected, the assignment will rotate as configured rather than rotating alphabetically.
- To configure a new Rotation, simply click the Plus button next to the Rotation dropdown or navigate to the Rotations menu found under the gear in the upper right -> Configuration Mode -> Assets & Work Management (menu shown below).
- On the Rotation configuration screen, there is a quick search bar to type in a user ID or clicking on the magnifying glass will open the User Finder to select the users. The same user can be added to the Rotation multiple times as needed.
- Once the users have been added to the Rotation, three buttons will also be shown. The eye button will skip the user when click (eye will change to have a strike-through), the middle button will copy the user to the line below, and the trashcan icon will remove that user from the Rotation. To move users within the Rotation, simply click and drag the user’s name to the new order.
- Please refer to the example below:
Materials Management
Inventory
- We have added a Copy button to the Item Master which will copy all of the Item details as well as the Locations with 0 On Hand and $0 cost records to be updated later.
- We have addressed an issue with the Avg Monthly Usage calculation that results in an incorrect number in specific circumstances.
Issuing
- We have addressed an issue that was causing header and line level comments from being saved in certain circumstances.
Minor Improvements
- We have addressed various maintenance issues as reported through the LLumin Support portal.
- We have added Accounting PO # to the Purchase Order Header when applicable.
- We have added validation to prevent users from marking their user as Inactive.
- We have improved the validation on required fields in the Asset master to show which field is failing validation.
- We have updated the caption on the Close button on the Purchase Order master to “Close PO”.
- We have made minor performance enhancements and minor front end improvements.